Introducing AI Writer
Your Ultimate Content Creation Companion AI Writer features templates for clickbait titles, ad headlines, engaging blog posts, catchy blog titles, and enticing blog intros and conclusions.
With AI Writer, you can summarize content, generate business ideas, rewrite with keywords and create academic essays.
The tool also offers tone changing capabilities, product comparisons, and creative storytelling features. From marketing frameworks to social media posts and website content, AI Writer enhances your content creation journey.
Step 1 : Navigate to AI Writer and choose a template that suits your content needs.
Step 2 : Within the selected template, you will find various customizable options based on the chosen, including the template name display and your credits balance.
Step 3: Opt to Include Your Brand Voice. For more information about this option, refer to the “Brand Voice Feature Tutorial”.
You should do this first
Step 4: Select your preferred language for the content generation process.
Step 5: Depending on the chosen template, input relevant company details such as Company Name and Company Description, or Name of the Blog Post, etc…
Step 6: Choose your AI Model based on your subscription plan. Options may include Chat GPT 3.5 Turbo.
Step 7: Adjust the creativity levels of your content
Step 8: Select the desired tone, whether it be sarcastic, professional, empathetic, etc.
Step 9: Decide on the number of results and the desired length for the generated text.
Welcome to the AI Text Editor tutorial
Step 1: Edit your text directly within the platform without the need to copy elsewhere. Make adjustments, enhance readability, and fine-tune your content to perfection.
Step 2: Save your edited text securely within your account or download it to your computer for offline access or future use.
Step 3: Give the AI Model access to the internet for enhanced data retrieval and improved content generation.
Step 4: Utilize the AI Assistant feature to enhance your editing process with intelligent suggestions and insights to elevate your text.
Step 5: Select the text you want to edit, or select the whole text and choose one feature from our Magic Brush
- Engage with the Magic Brush feature, offering a range of powerful editing functionalities:
- Rewrite Content: Reframe your text for clarity and impact.
- Expand Content: Enhance the depth and detail of your writing.
- Shrink Content: Condense text while retaining key information.
- Simplify Content: Streamline complex sentences for readability.
- Translate Content: Seamlessly translate your text into different languages.
Introducing the Ai Article Wizard – your go-to tool for effortless article creation. Define topics, generate keywords, and fine-tune advanced settings such as writing tone, creativity level, and article length to tailor your content to perfection. With the ability to choose the AI model, point of view, and language, the Ai Article Wizard empowers you to craft engaging and insightful articles with ease. Elevate your writing experience and unlock your creativity with this innovative feature.
GET IDEAS
Step 1: Begin by entering a brief description of the article topic, outlining what you want the content to focus on and convey.
Step 2: Determine the number of topics you wish to cover within the article to ensure comprehensive coverage and structure.
Step 3: Set the maximum number of words allowed per topic to maintain focus and conciseness in the content.
Step 4: Utilize the Keywords Generator tool to generate relevant keywords that will enhance the visibility and SEO ranking of your article.
Step 5: Specify the desired number of keywords to be included in the article for optimal search engine optimization.
Advanced Settings:
Step 6: Choose the AI Model that aligns with your subscription plan for tailored content generation and enhanced results.
Step 7: Select the appropriate writing tone for your article, whether it be formal, casual, professional, or engaging.
Step 8: Adjust the creativity level of the AI-generated content to suit your preferences, ranging from standard to highly imaginative.
Step 9: Define the point of view for the article, such as First Person, to personalize and add depth to the narrative.
Step 10: Specify the desired length of the article, for example, 1000 words, to tailor the content to your requirements.
Step 11: Choose the language in which the article will be generated to ensure clarity and accuracy in the final output.
Outlines
Step 1: Incorporate the chosen title from the initial steps into the outline creation process to maintain consistency and focus throughout the article.
Step 2: Revisit the generated keywords to enrich the outlines and reinforce the main points of the article for enhanced relevance and search engine optimization.
Step 3: Define the number of outlines needed to structure the article effectively and guide the content flow for a coherent narrative.
Step 4: Establish the number of subtitles to further segment the content within each outline, organizing information and enhancing readability.
Step 5: Delve into advanced settings to customize the outlines further, adjusting AI model preferences, writing tone, creativity levels, and choosing the point of view.
Talking Points
Step 1: Fine-tune your article title on this page to ensure it accurately reflects the content and captures readers’ attention effectively.
Step 2: Add new keywords to supplement the existing ones, further optimizing the article for search engines and enhancing its visibility.
Step 3: Evaluate and adjust the previously generated article outlines to align with the evolving content structure and ensure a coherent narrative flow.
Step 4: Specify the desired number of talking points within each outline to hone in on key concepts and facilitate detailed discussion.
Step 5: Establish the maximum word count allowed for each talking point to maintain conciseness and focus in the content.
Step 6: Explore Advanced Options
Learn how to effortlessly rewrite text with the Rewriter feature on the platform.
Step 1: Opt to Include Your Brand Voice. For more information about this option, refer to the “Brand Voice Feature Tutorial”
You should do this first.
Step 2: Select your preferred language for the content generation process.
Step 3: Depending on the chosen template, input relevant company details such as Company Name and Company Description, or Name of the Blog Post, etc…
Step 4: Choose your AI Model based on your subscription plan. Options may include Chat GPT 3.5 Turbo.
Step 5: Adjust the creativity levels of your content
Step 6: Select the desired tone, whether it be sarcastic, professional, empathetic, etc.
Step 7: Decide on the number of results and the desired length for the generated text.
Welcome to the AI Text Editor tutorial
Step 1: Edit your text directly within the platform without the need to copy elsewhere. Make adjustments, enhance readability, and fine-tune your content to perfection.
Step 2: Save your edited text securely within your account or download it to your computer for offline access or future use.
Step 3: Give the AI Model access to the internet for enhanced data retrieval and improved content generation.
Step 4: Utilize the AI Assistant feature to enhance your editing process with intelligent suggestions and insights to elevate your text.
Step 5: Select the text you want to edit, or select the whole text and choose one feature from our Magic Brush
- Engage with the Magic Brush feature, offering a range of powerful editing functionalities:
- Rewrite Content: Reframe your text for clarity and impact.
- Expand Content: Enhance the depth and detail of your writing.
- Shrink Content: Condense text while retaining key information.
- Simplify Content: Streamline complex sentences for readability.
- Translate Content: Seamlessly translate your text into different languages.
By following these steps, you can harness the power of AI Images to bring your creative ideas to life with unique and customizable visuals.
Step 1: Access the AI Images Feature
- Log in to the platform where the AI Images feature is available.
- Locate the AI Images tool or section on the platform.
Step 2: Right Sidebar Options
- Select the Number of Images you want to generate.
- Adjust the Image Resolution for your desired quality.
- Experiment with different Image Styles, Lighting Styles and Mood.
Step 3: Input Your Prompts
- Start by entering your creative prompts or descriptions for the image you want to generate.
- Consider details like the scene, objects, emotions, and any specific elements you want to include.
Step 4: Explore Additional Options (for Stable Diffusion)
- Switch to the Stable Diffusion mode to access advanced features.
- Customize Image Strength, Prompt Strength, and Generation Steps for more control.
- Adjust Image Diffusion Samples and utilize Clip Guidance Presets for finer details.
Step 5: Try Extra Options
- Experiment with Extra Options like Image to Image, Image Upscale, and Image Inpainting for different effects.
- Play around with Medium, Mood, and Artist Name settings for added personalization.
Step 6: Generate the Image
- Once you’ve set all your preferences and options, click on the Generate button to create your image.
- Wait for the AI to process and generate the visuals based on your inputs.
Step 7: Review and Save
- Review the generated image and see if it aligns with your vision.
AI Voice Over: Your Gateway to Customized Audio Solutions
Text to Speech Feature:
Step 1: Choose the language in which you want the text to be into speech.
Step 2: Explore a range of characters’ voices and select the one that best complements your content.
Step 3: Assign a name to your audio file to easily identify it later.
Step 4: Enter the text that you want to convert into speech.
Voice Cloning Feature:
Step 1: Define a unique name for your new character voice.
Step 2: Enhance the accuracy of an existing voice by retraining it.
Step 3: Upload 1-2 minutes of high-quality audio samples (up to 10MB in MP3 format) to clone a new voice.
Step 4: Select the gender of the voice you are creating: Male or Female.
Step 5: Provide a brief description to provide context or details about the voice you are creating.
With AI Voice Over’s text to speech and voice cloning capabilities, you can effortlessly generate custom audio content tailored to your preferences and needs.”
Creating Text from Audio with AI Speech to Text
Step 1: Drag and drop your audio file into the designated area or click the browse button to select a supported file format (.mp3, .mp4, .mpeg, .ga, .m4a, .wav, .web).Ensure the audio file does not exceed the maximum size of 25MB.
Step 2: Provide a brief description of the audio content to provide context for transcription process.
Step 3: Input the language spoken in the audio file, if known, to optimize accuracy during the transcription.
Step 4: Select the task type associated with the audio content (if applicable) to tailor the transcription process for specific needs.
Step 5: Click on the conversion or transcribe button to start the process of generating text from the uploaded audio file.
Step 6: Once the transcription is complete, review the generated text for accuracy.
Step 7: Save the transcribed text for future reference or export it in a desired format for further use.
By following these simple steps, you can leverage the AI Speech to Text feature to efficiently convert audio files into text, enabling seamless access to valuable audio content in textual form.
How to Navigate AI Chat1. Explore Assistant Selection
-
- Browse through our lineup of AI assistants, each adept in a specific field or area of expertise.
- Select the AI assistant that aligns with your query or topic of interest.
- Pose Your Queries
- Ask your questions, seek advice, or engage in discussions within the designated area of expertise of your chosen AI assistant.
- Enjoy insightful and accurate responses crafted specially for you.
- Benefit from Expertise
- Dive deep into the realm of knowledge and expertise offered by your selected AI assistant.
- Find solutions, information, and guidance on various subjects with expert precision.
- Discover New Avenues
- Discover a world of possibilities as you interact with different AI assistants covering a wide range of subjects and interests.
- Unearth fresh insights, learn something new, and enhance your understanding in various domains.
- Enjoy Seamless Conversations
- Engage in seamless conversations with your AI assistant, receiving prompt and informative responses every step of the way.
- Immerse yourself in an interactive and enriching experience tailored to your interests.
AI Vision: Unlocking Visual Insights with Precision
Embark on an intuitive journey with AI Vision, where your images transform into a source of profound insights and understanding. Follow these steps to utilize the power of our advanced AI models and discover more about any image you choose to analyze.
Tutorial for Using AI Vision
Step 1: Begin by starting a new conversation on the AI Vision platform. This step ensures that all prior data or sessions are cleared, providing a fresh slate for your new image analysis.
Step 2: Select from our diverse array of sophisticated AI models to suit your specific image analysis needs:
- ChatGPT 3.5: Ideal for general insights and straightforward image queries.
- Turbo: Boosts processing speed, perfect for when you need quick responses.
- 4 Turbo: Offers enhanced processing capabilities for more complex images.
- 4 Turbo Vision: Specializes in deep visual analysis, extracting detailed elements and compositions.
- ChatGPT 4.0: The most advanced option, combining high-detail recognition with contextual awareness for comprehensive image understanding.
Step 3: If you need inspiration or specific types of analysis, our Prompt Library offers suggested questions and prompts to guide your interaction with the AI. Choose a prompt that aligns with the nuances you are interested in exploring.
Step 5: Once the image is uploaded and you have selected your preferred AI model and prompt, the model will analyze the image. It will identify objects, texts, and other pertinent details based on the capabilities of the chosen model.
Step 6: The analysis results will be displayed on your screen. Take your time to review the detailed insights provided by the AI. This could range from object recognition and text extraction to deeper insights like sentiment analysis and contextual interpretation depending on the model used.
Step 7: Should you have any follow-up questions or need further clarification on certain elements of the image, continue the conversation with the AI. Use the insights as a springboard to explore deeper questions and applications.
Step 8: You can save the results of your image analysis for future reference or export the data in a suitable format for presentations or further research.
By utilizing AI Vision, you unlock a deeper understanding of visual content, powered by state-of-the-art AI technology. Each image has a story to tell, and with AI Vision, you’re equipped to listen and learn meticulously.”
- Start by opening a new session in AI File Chat. This ensures a clean slate for your analysis, removing any remnants of previous sessions to optimize performance and accuracy.
- Click on the upload button to select the file you wish to analyze. AI File Chat supports various formats such as .txt, .csv, and readable .pdf.
- Ensure the file size and format comply with the platform’s guidelines.
- Include a specific question or a type of analysis you are looking for. For instance, you can ask, “What is the performance trend of my recent Facebook ads?” or “Extract all transaction data from the provided CSV file.”
- Utilizing our brand voice feature, you can also dictate the tonality in which the information is analyzed and presented, aligning the output with your corporate standards or personal preferences.
- Once the file is uploaded and the AI model is set, the system will process the document. This involves reading the data, extracting relevant information, and analyzing the contents based on your query.
- The AI will provide a detailed breakdown of the analysis, highlighting key data points, trends, and answers to your specific questions.
- Review these insights to gain a deeper understanding of the information within your file.
- Save the analysis for later reference, or export the insights in a format suitable for your needs, such as a report or a spreadsheet.
AI Web Chat: Deep Dive into Website Analytics
Explore the digital realm with AI Web Chat, your go-to solution for comprehensive website analysis. Whether you’re evaluating the user experience, seeking insights on traffic patterns, or investigating SEO strategies, AI Web Chat provides an all-encompassing overview of any website you choose to examine. Follow this straightforward tutorial to maximize your website analysis using AI Web chat.
Tutorial for Using AI Web Chat
Step 1: Initiate a New Conversation
- Start by launching a new session in AI Web Chat. This ensures clarity and focus, free from any data leftovers from previous inquiries.
Step 2: Enter the Website URL
- Input the URL of the website you wish to analyze. Make sure the URL is correct to ensure that the AI analyzes the right website.
Step 3: Ask Your Questions
- Once the website is loaded within our system, begin by typing out specific questions you have regarding the site. Here are a few examples of what you can ask:
2. Who is the target audience for this website?
3. Is the website easy to navigate and user-friendly?
4. Are there any specific features or functionalities that stand out on the website?
5. How frequently is the website updated with new content?
6. Does the website load quickly and perform well on different devices?
7. Is the website secure and does it have a privacy policy?
8. How is the overall design and layout of the website?
9. Are there any interactive elements on the website that engage users?
10. Does the website have social media integration?
11. Are there any customer reviews or testimonials visible on the website?
12. What is the primary call-to-action on the website?
13. Does the website have a search function for easy browsing?
14. Are there any accessibility features for users with disabilities?
15. Is the content on the website well-written and informative?
16. How does the website compare to competitors in the same industry?
17. Are there any upcoming events or promotions featured on the website?
18. Does the website have a blog or news section for updates?
19. Are there clear contact details or a way to get in touch with the website owners?
20. What sets this website apart from others in the same category?
Step 4: AI Analysis
- After submitting your questions, our AI will start analyzing the website based on the available data and metrics. This process involves crawling the website, extracting data, and using sophisticated algorithms to provide precise answers to your queries.
Step 5: Review Insights
- The AI will present a compiled analysis answering your specific questions. Each answer will be supported by data collected from the website, offering you a clear and detailed insight into various aspects of the site.
Step 6: Engage in Further Queries
- If the initial answers spark more questions or if you need clarification on specific points, continue the conversation. AI Web Chat is designed to engage in a dynamic interaction, allowing for deep dives into particular areas of interest.
Step 7: Conclusion of Analysis
- Once you are satisfied with the insights provided, you can conclude your session. Optional steps include saving the conversation for future reference or exporting the data for further analysis or presentation needs.
Through these steps, AI Web Chat empowers you to grasp a deeper understanding of any website, providing valuable insights that can help enhance web strategies, improve user engagement, and optimize overall web presence. Embrace the advanced capabilities of AI to unlock new potentials in digital analytics with AI Web Chat.”
Tutorial for Using AI Chat Image
Step 1: Open AI Chat Image and start a new session. This ensures a fresh beginning for each of your creative adventures.
Step 2: Type in a detailed prompt describing the image you envision. The more specific you are, the better the AI can understand your request and deliver accurate results. For example, instead of saying ‘a dog’, say ‘a fluffy Corgi sitting on a sunny beach under a blue umbrella’.
Step 3: Select the desired style and quality of the image. AI Chat Image may offer options such as photorealistic, cartoon-style, or oil painting effects. Choose the one that best suits the theme and purpose of your image.
Step 4: Once your prompt is set and preferences are selected, click the ‘Generate’ button. DALL-E will process the information and start creating the image based on your specifications.
Step 5: View the generated image. If it doesn’t quite match your expectations or you think of additional adjustments, you can refine your prompt and regenerate the image. Sometimes slight adjustments in wording can make a big difference in the output.
Step 6: When you are satisfied with the generated image, you can save it to your device. Alternatively, if you want to experiment further, you can modify elements of the image or use it as a basis for a new creation, iterating as much as you like.
AI CODE Creator: Programming Made Easy
Harness the power of AI to streamline your coding process with AI CODE Creator. This feature allows you to generate code snippets and entire programs across a variety of languages including C, C++, C#, Java, Python, HTML, PHP, Shell, Ruby, and PowerShell. Simply choose your AI model based on the complexity and requirements of your task, and let AI CODE Creator do the heavy lifting. Follow this guide to begin effortlessly generating code using just text commands.
Tutorial for Using AI CODE Creator
Step 1: Choose from a range of AI models tailored to different coding needs:
- ChatGPT 3.5: Ideal for general coding tasks and educational purposes.
- ChatGPT 4: Provides advanced code generation capability for more complex tasks.
- ChatGPT 4 Turbo: Offers a balance between speed and efficiency, suitable for professional development needs.
- ChatGPT 4 Turbo Vision: Enhances the capability with contextual understanding for more integrated coding requirements.
Step 2: Indicate which programming language you need the code in. AI CODE Creator supports a wide array, from mainstream languages like Java and Python to specialized ones like Shell and PowerShell.
Step 3: Clearly describe the code you want to generate. Be as detailed as possible to ensure accuracy in the output. For example, instead of saying “make a loop,” specify “create a for loop in Python to iterate through a list of integers.”
Step 4: Once you have provided the necessary information, submit your request. AI CODE Creator will process your specifications and generate the corresponding code.
Step 5: Examine the generated code snippet or program. If something doesn’t meet your expectations or requires adjustment, you can modify your request and ask the AI to regenerate the code.
Step 6: It’s important to test the code within your development environment to ensure it functions as intended. This step verifies the accuracy and efficiency of the code generated by AI CODE Creator.
Step 7: After testing and final adjustments, save the code for future use, or integrate it into your project. AI CODE Creator helps you accelerate the development process, allowing more time for optimization and refinement.
AI CODE Creator is designed for developers, students, and professionals who want to enhance their productivity and focus on creative aspects of programming while leaving the routine coding tasks to AI. Whether you are building a simple application or working on a complex system, AI CODE Creator is your companion in the digital creation space. Let AI take careist the logistics of code generation, so you can innovate and explore new possibilities in your projects.”
Voice Brand Builder: Personalize Your Digital Presence
Enhance your content creation with Voice Brand Builder, a feature designed to embed your unique brand voice across various platforms and communications. By defining the key characteristics of your brand, the Voice Brand Builder ensures that all produced content resonates with your brand’s identity and appeals directly to your target audience. Here is how you can set up your Voice Brand for integrated and consistent content generation.
Tutorial for Using Voice Brand Builder
Step 1: Begin by entering the foundational information about your brand. This includes:
- Company / Brand Name: The official name of your brand.
- Website: URL of your company’s main website.
- Industry: The sector or market your brand operates within.
- Tagline: Your brand’s slogan or catchphrase that encapsulates your identity or mission.
- Target Audience: Who your brand is aiming to reach; be specific about demographics or interests.
- Company / Brand Description: Provide a concise overview explaining what your company is about and what sets it apart.
Step 2: Detail the products or services your brand offers:
- Product/Service Name: Name of each product or service.
- Brief Product/Service Description: A short description of what the product or service is and its key features.
- Choose Product/Service Category: Classify your product/service into relevant categories to help tailor content more effectively.
Step 6: With your Voice Brand configured, you can now streamline content creation across different features with confidence that all generated outputs will adhere to your brand’s voice, ensuring a consistent and recognizable brand identity.
Voice Brand Builder not only simplifies the content creation process across your digital platforms but also ensures that all communications are aligned with your brand’s core values and appeal. This leads to a stronger brand presence and a more cohesive user experience. Set up your Voice Brand today and watch your brand’s digital voice come to life uniformly and brilliantly.”
How to Configure WordPress:
- Step 0: As WordPress integration is a user based feature, share these instructions with them:
- Step 1: Log in to your WordPress admin dashboard using your credentials.
- Step 2: Disable 2FA in case if you have turned it on in your settigs.
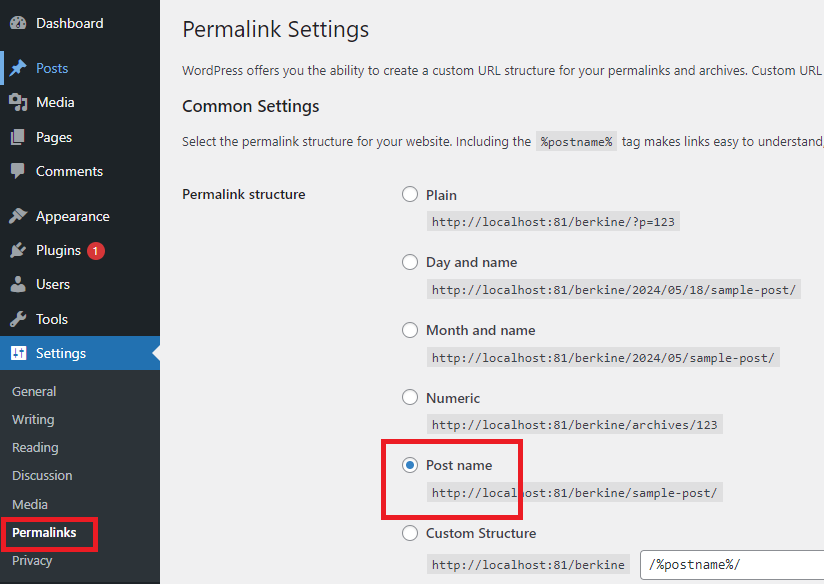
- Step 3: Go to Settings – Permalinks page and select postname.
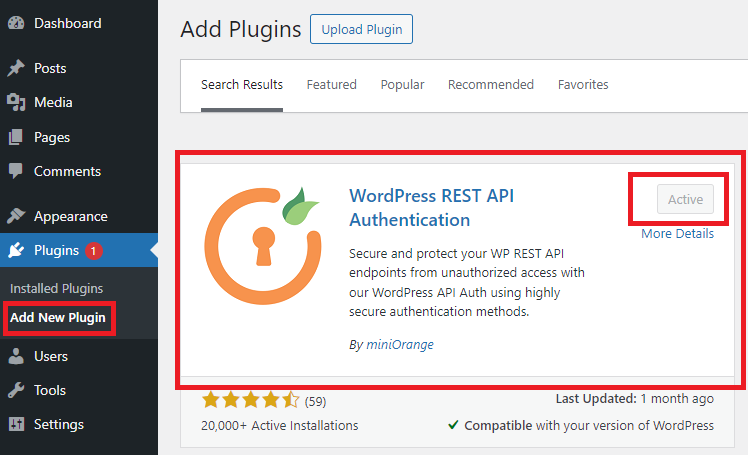
- Step 4: Go to Plugins – Add New Plugin and install WordPress REST API Authentication, make sure that after installation it is activated.
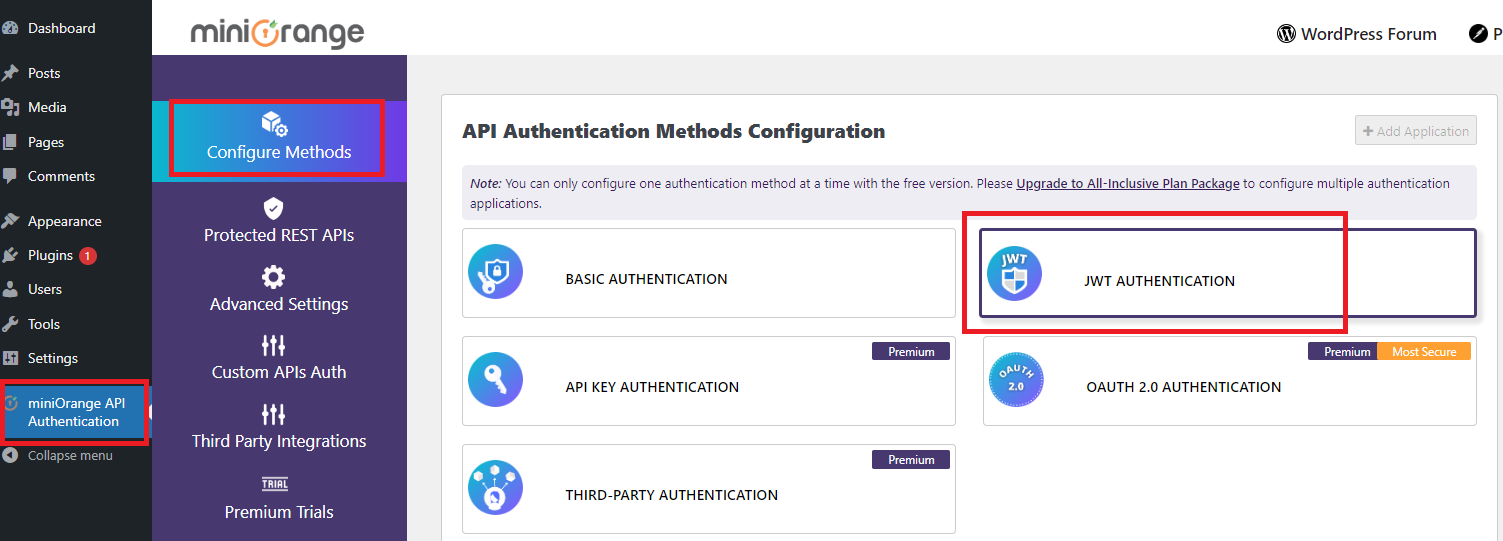
- Step 5: Once the installation is complete click on miniOrange API Authentication and click on JWT Authentication as shown in the image.
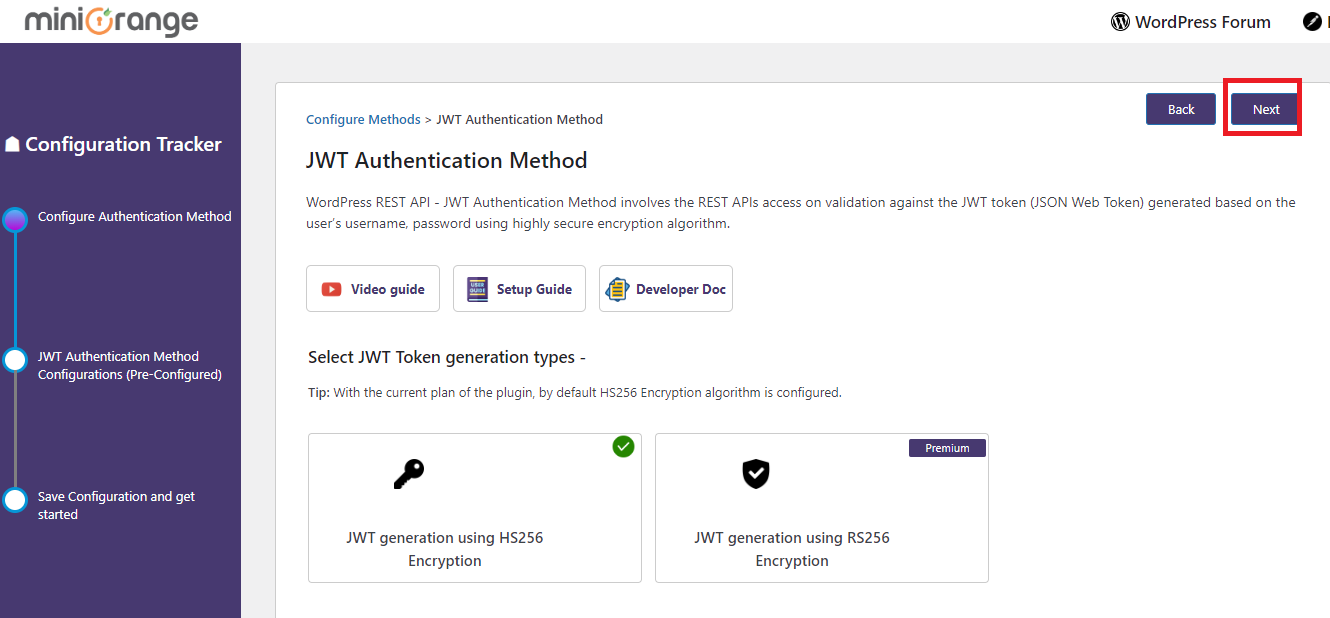
- Step 6: Click on Next button as shown in the image.
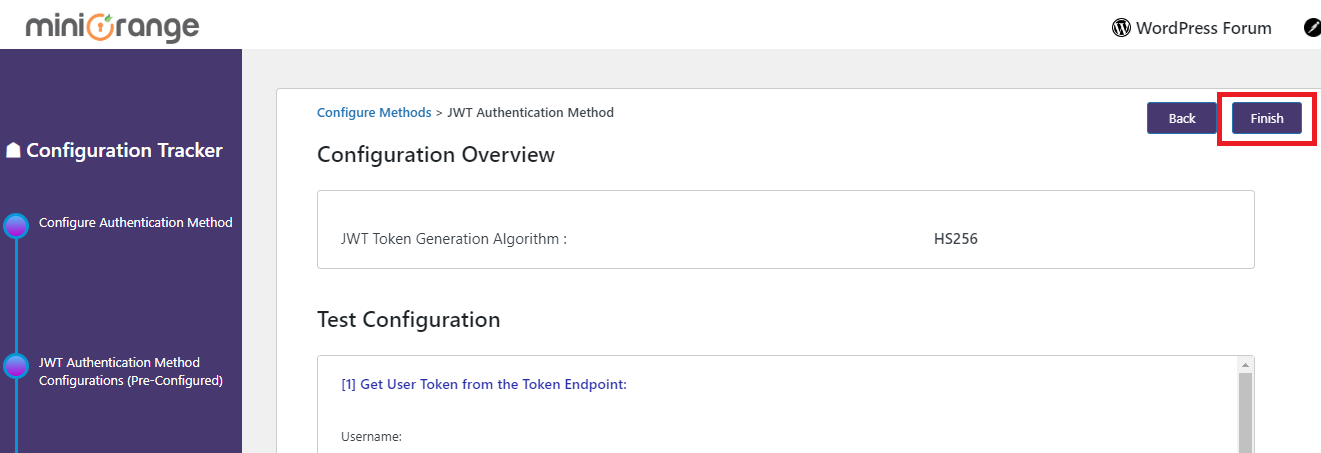
- Step 7: Click on Finish button as shown in the image.
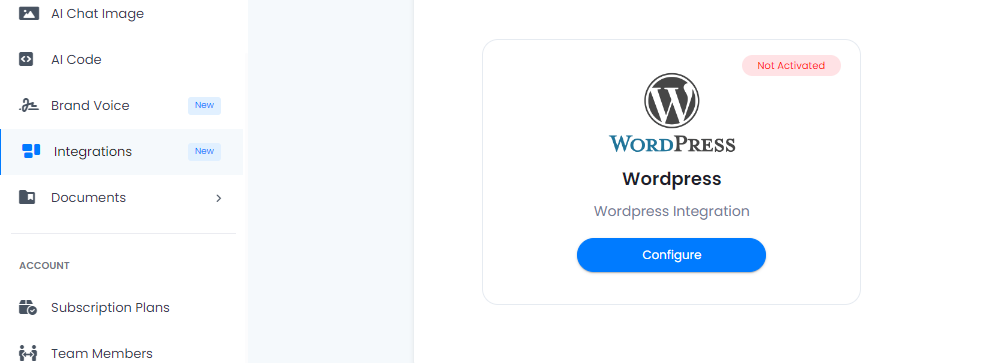
- Step 8: In the Pluxora Settings – Extended Features tab make sure that Integration feature is turned on.
- Step 9: After it is turned on, it will appear in the side menu so that each user can configure their wordpress, click on WordPress.
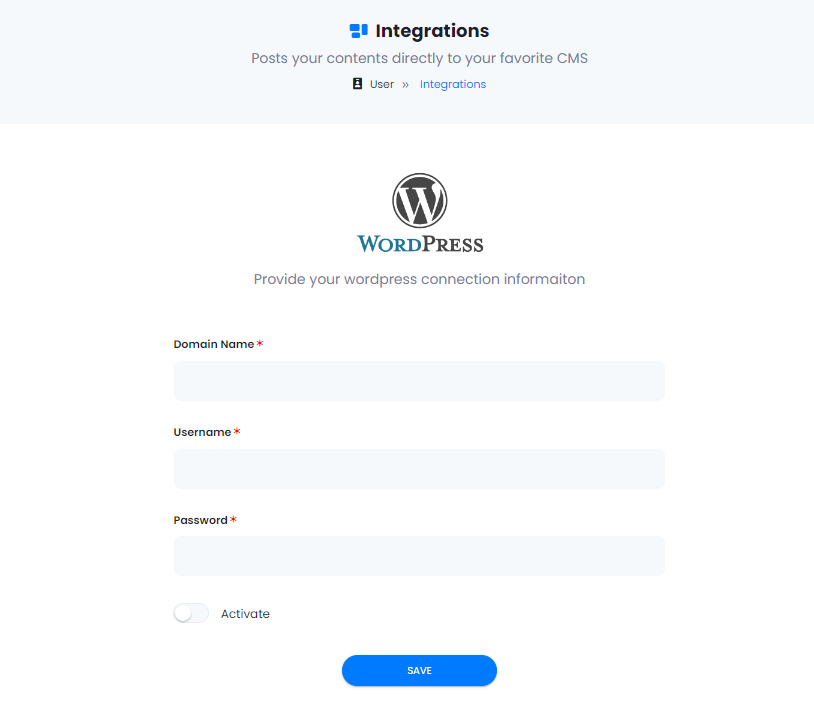
- Step 10: Enter your Domain name, Username and Passowrd, and don’t forget to Activate the feature and click on Save botton.
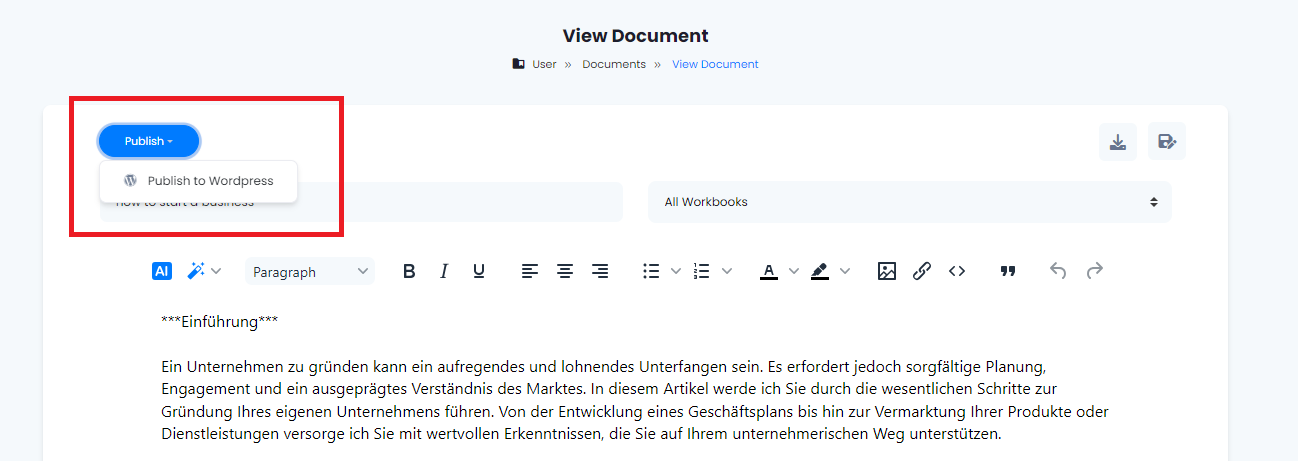
- Step 11: Go to your saved documents and you will see a Publish button, click on it and you are ready to post directly on your WordPress account.
- Step 12: Done.
Team Members Management: Empower Your Team and Monitor Credit Usage
With the ‘Team Members’ feature, you can efficiently organize and oversee your team’s activities while keeping track of their credit usage. Depending on your subscription plan, you can add up to 5 team members, enabling collaborative work and enhanced productivity within your workspace. Follow this step-by-step tutorial to effectively manage your team members and review their credit usage.
Tutorial for Using Team Members Feature
Step 1: Navigate to the dashboard or settings menu of your platform where the ‘Team Members’ tab is located. Click on ‘Team Members’ to enter the section.
Step 2: Look for the ‘Add Member’ or ‘Invite Member’ button within the ‘Team Members’ section. Click on it to invite team members by entering their email addresses. Depending on your subscription plan, add up to 5 team members.
Step 3: Within the ‘Team Members’ section, monitor how many credits each team member has utilized. This helps in managing resources effectively.
Step 4: If applicable, allocate a specific number of credits to each team member based on their role and usage requirements. Ensure a fair distribution of credits to prevent resource depletion or uneven workload distribution.
Step 5: Encourage team members to utilize credits efficiently and avoid unnecessary consumption. Provide training or guidelines on best practices for maximizing credit usage while maintaining productivity.
Step 6: Periodically evaluate the team’s credit usage patterns and overall productivity. Adjust credit allocations as necessary to optimize team performance and resource utilization.
By following these steps, you can effectively manage your team members, review their credit usage, and ensure a collaborative and productive work environment within your workspace. Empower your team members to leverage resources effectively and drive success in your projects and tasks.”
Affiliate Program: Generate Income by Referring Friends
Unlock the potential to earn commissions by participating in the Affiliate Program. Invite your friends to join Plora and receive rewards from their initial purchase. Follow this tutorial to understand and utilize the Affiliate Program effectively.
Tutorial for Utilizing the Affiliate Program
Step 1: Access Your Referral Link
- Locate your unique referral link provided: https://pluxora.com/?ref=7ECKOXHKKQ0DI3K
- Copy this link to share with your friends to start commissions.
Step 2: Send out invitations to your friends, highlighting the benefits of using Pluxora. Encourage them to register through your referral link.
Step 3: Once your referred friends complete their first subscription plan purchase, you will start earning commissions at a rate of 15% of their payment.
Step 4: Share your referral link with potential users by email or social media platforms to increase your referral network.
Step 5: Instruct your friends to sign up using the shared referral link to ensure their registrations are linked to your account for commission tracking.
Step 6: Access the ‘Payout Request’ section to configure your payout details and receive the earned commissions.
Step 7: Select the preferred method to receive your commissions, either through PayPal or Bank Transfer.
Step 8: Fill in the necessary details for your chosen payout method. For PayPal, enter your PayPal ID. For Bank Transfer, provide the required banking information including Bank Name, Account Name, Account Number/IBAN, BIC/Swift, and Routing Number.
Step 9: Decide on the amount you wish to request; the minimum allowed amount for payout is €100.
By following these steps, you can effectively utilize the Pluxora Affiliate Program and start earning commissions by referring friends. Maximize your potential earnings by inviting more users to join Pluxora through your referral link. Happy referring and earning!”